Why Wide Guard Comb Attachments Leave Track Lines
Great Clipper Work Begins Long Before the Clipper Turns On
The quality of your clipper work is determined by the quality of your coat preparation.
One of the biggest misconceptions about guard comb attachments is that smoother clipper work begins with the clipper itself.
In reality, the haircut begins much earlier. Long before the clipper is switched on, every step of coat preparation influences the quality of the finished result. Proper bathing, conditioning, drying, brushing, and combing each play an important role in creating a coat that's ready to be clipped smoothly and consistently.
Rather than waiting until the end to discover a problem, experienced groomers evaluate the coat throughout the preparation process. Each step becomes an opportunity to identify and correct issues before they affect the finished haircut.
My Coat Preparation Checkpoints
I don't wait until the clipper leaves track lines to find out something was missed.
Instead, I inspect the coat at every stage of preparation. While the dog is still in the bath, I check for tangles and mats before rinsing. If I find tangles or excess undercoat, I'll apply conditioner and gently brush through the coat while it's still wet. The conditioner creates excellent slip, allowing tangles and loose undercoat to release much more easily and comfortably than they do on a dry coat. It's one of the simplest ways to improve coat preparation before drying even begins.
During force drying, I'm doing much more than drying the dog.
The high-velocity dryer opens the coat and allows me to see all the way to the skin. As the coat separates, I can immediately identify trapped undercoat, tiny tangles, or compacted areas that would interfere with smooth clipper work later. Those problems are corrected while I'm drying—not after.
Once the coat is completely dry, I perform one final brush-out.
This final step is easy to skip, but it's incredibly important. Drying can create tiny whip knots that aren't always obvious until a guard comb catches them. Even small tangles can interrupt coat feed, causing the attachment to snag or leave unwanted holes and track lines in the finish.
Only after that final brush-out do I perform what I call The Comb Test.
The Comb Test
Before I begin any clipper or scissor work, I run a metal comb through every area that will be groomed.
The goal isn't simply to comb the coat.
The comb is my proof that the coat is truly ready. If the comb glides effortlessly from skin to tip without catching, I know the coat has been properly prepared. If the comb snags, catches, or hesitates—even slightly—my preparation isn't finished. That small moment tells me something still needs attention before the clipper ever touches the coat.
In my experience, this simple habit prevents countless clipping problems before they ever happen.
Clipper Speed Matters More Than Most Groomers Realize
A guard comb attachment doesn't just change the cutting length—it changes the amount of work your clipper must perform.
The guard comb is feeding more coat into the blade than the blade would normally cut. That means your clipper must move a wider blade while simultaneously cutting a greater volume of coat with every pass. If the clipper can't keep up with that increased workload, the quality of the haircut begins to suffer.
The first sign I notice isn't usually the sound of the clipper. It's the finish. A choppy haircut tells me my clipper isn't keeping up with the amount of coat I'm asking it to cut.
As resistance increases, I may also hear the motor change pitch. Instead of maintaining a smooth, consistent sound, the clipper begins working harder as more coat reaches the blade than it can efficiently process. In heavier coats, that resistance can even cause the guard comb attachment to shift out of alignment or pop off the blade altogether.
For this reason, I recommend using the highest speed setting available on your clipper whenever you're using guard comb attachments. The faster blade speed helps the clipper keep pace with the increased volume of coat being delivered to the cutting edge.
Just as important, slow your clipper pass—not your clipper speed.
Moving the clipper more deliberately gives the blade enough time to cut the coat cleanly while maintaining smooth, consistent coat feed. Many groomers instinctively move too quickly, asking the clipper to cut more coat than it can comfortably process in a single pass.
Think of it this way...
A guard comb attachment is asking your clipper to do more work than a blade alone. Giving the clipper the speed it needs—and the time it needs—often produces a noticeably smoother finish.

Track lines aren't always caused by poor technique. Learn the mechanical, grooming, and design factors that influence finish quality—and how understanding coat feed helps you create smoother, more consistent haircuts.
Every professional groomer has looked down at a freshly clipped dog and noticed unwanted track lines. It's frustrating. You've bathed the dog. You've dried the coat. You're using quality equipment.
Yet the finish still doesn't look as smooth as you expected. The good news? Track lines are rarely caused by just one thing. In fact, they're usually the result of several small factors working together.
Over the years, I've learned through plenty of trial and error that smoother clipper work isn't about finding one magic guard comb attachment—it's about understanding what affects the entire clipping process.
Let's walk through the biggest reasons track lines happen and, more importantly, what you can do to prevent them.


💡 Amy's Tip...
Slow your clipper pass—not your clipper speed.
A guard comb attachment feeds more coat into the blade than the blade would normally cut. Give the clipper the blade speed to handle the workload, then slow your movement across the coat to allow the blade time to make a clean, consistent cut.
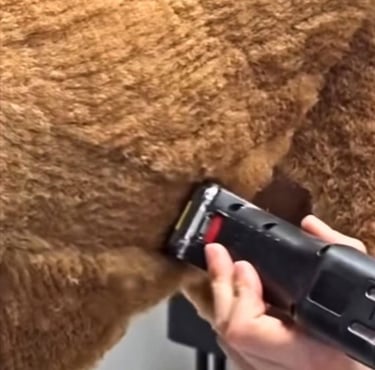
Keep Your Blade Clear: Why Blade Packing Causes Track Lines
One of the simplest causes of track lines is also one of the easiest to overlook.
A perfectly prepared coat and sharp blade can't perform at their best if clipped hair blocks the clipper blade's cutting edge.
Blade packing
As you groom, tiny hair clippings naturally collect between the teeth of the clipper blade. When enough clipped hair becomes trapped, the blade can no longer cut efficiently because portions of the cutting edge are blocked.
The first thing I notice usually isn't the packed blade.
It's the haircut. When I suddenly see the finish becoming choppy, that's my signal to stop and check the blade. More often than not, I'll find tiny clipped hairs packed tightly between the blade teeth.
The solution is simple.
Remove the guard comb attachment and brush the trapped hair from between the blade teeth. Depending on the coat type, density, and length of the grooming session, you may need to repeat this several times on the same dog. It's easy to assume something is wrong with your clipper, your blade, or your technique.
Often, the only problem is that the blade can no longer accept the coat being fed into it.
The blade can only cut the coat that reaches its cutting edge. Keeping the blade clear allows coat feed to continue uninterrupted.
Not All Track Lines Are Caused by Technique
At this point, you've prepared the coat correctly.
You've passed the Comb Test. Your blade is clean and sharp. Your clipper is running at full speed. You're moving at a steady pace.
Yet the finish still isn't as smooth as you'd expect.
That raises an important question. Could the design of the guard comb attachment itself influence the finished result?
For years, I believed the answer was no. Like many groomers, I assumed wide guard comb attachments were essentially the same. They all fit the same blades, performed the same basic function, and looked remarkably similar. But after repeatedly encountering the same clipping challenges—even with excellent coat preparation and technique—I decided to stop looking at the haircut and start looking at the tool.
What I discovered changed the way I viewed guard comb attachments forever.
As I studied different attachments, I began noticing design characteristics that most groomers never think about: tooth spacing, tooth geometry, how evenly the teeth were distributed across the width of the attachment, and how those features influenced coat feed.
It became clear that a guard comb attachment isn't simply a spacer that determines coat length. It also guides the coat toward the cutting edge of the blade. And if the coat isn't guided consistently... the blade can only cut what successfully reaches it.
That realization changed the questions I began asking—not only as a groomer, but eventually as an inventor.
Track Lines Are a Clue—Not a Failure
Every track line is an opportunity to learn what the coat, clipper, or attachment is trying to tell you.
For years, I viewed track lines as something to fix. Today, I see them differently. Track lines are information. They're the coat, the clipper, or the attachment telling me that something in the clipping process needs attention.
Instead of immediately making another pass over the same area, I pause and ask a few simple questions. Did the coat pass the Comb Test? Is the coat completely clean, conditioned, and properly dried? Is my blade clean and free of packed hair? Is my clipper keeping up with the amount of coat I'm asking it to cut? Am I giving the blade enough time to do its job?
Those questions almost always lead me to the answer.
The goal isn't to become a groomer who never sees track lines. The goal is to become a groomer who understands why they appear and knows how to correct them with confidence. Every track line teaches you something. The more closely you observe the clipping process, the more those small clues begin revealing the story behind the haircut.
That's how experience is built. Not by making fewer mistakes. But by becoming better at understanding what each grooming session is trying to teach you.
The next time you see track lines, don't reach for your blending shears first. Pause. Look closer. The finish is telling you a story. Learn to read it, and you'll become a better groomer with every dog that stands on your table.